
How to secure an ATV or UTV in a toy hauler or on a trailer
Use four rated straps pulling outward and away from the machine, attached to solid frame or wheel points. Never attach to plastic or steering parts. Use the working load limit, not breaking strength, and re-check after the first few kilometres.
Recommended tools & parts for this job

Toy hauler & trailer tie-downs
Heavy-duty ratchet straps (rated WLL)
The main tie-down for ATVs and UTVs. Check the working load limit on the label.
Check price on Amazon.ca
Toy hauler & trailer tie-downs
Axle straps
Wraps around axles or frame so hooks don't damage parts.
Check price on Amazon.ca
Toy hauler & trailer tie-downs
Tire/wheel bonnet straps for UTVs
Secures through the tire rather than the suspension, so the load can't bounce loose.
Check price on Amazon.caToy hauler & trailer tie-downs
Soft loop tie-down straps
Make a clean anchor on handlebars or frame without scratching.
Check price on Amazon.ca
Toy hauler & trailer tie-downs
E-track rails
Flexible anchor points on toy hauler floors and walls.
Check price on Amazon.ca
Toy hauler & trailer tie-downs
Bolt-on D-rings (rated)
Adds anchor points. Bolt through with backing plates.
Check price on Amazon.ca
Toy hauler & trailer tie-downs
ATV/UTV wheel chock
Stops rolling while you tie down.
Check price on Amazon.ca
Toy hauler & trailer tie-downs
Folding ATV/UTV loading ramps (rated)
Use ramps rated for the machine's weight and secure them to the deck.
Check price on Amazon.ca
Toy hauler & trailer tie-downs
Trailer / utility winch
Pulls a non-running machine up the ramp. Use the rated anchor point.
Check price on Amazon.caAs an Amazon Associate I earn from qualifying purchases. Always confirm part numbers and sizes against your RV or appliance model before ordering. See all recommended RV tools & parts →
Why proper tie-downs matter
A loose machine can shift on a curve or under hard braking, damaging the trailer or toy hauler and changing how it handles. The goal is simple: the machine should not move in any direction, and it should stay that way for the whole trip.
Safety: Load and unload on level ground, with the trailer hitched and the wheels chocked. Use ramps rated for the machine's weight that are secured to the deck, and never stand downhill of a machine on a ramp. Wear a helmet if you ride it up. For a non-running machine, use a winch on a rated anchor. In toy haulers, fuel vapour and exhaust can enter living areas, so ventilate, keep fuel caps tight and make sure your CO and propane alarms work.
Gear you need
- Four ratchet straps (or cam straps for light machines), each marked with a working load limit (WLL)
- Axle straps or soft loops to wrap around frame or axle points without abrasion
- Wheel bonnet straps for UTVs, which secure through the tire instead of the suspension
- Rated anchors: E-track or L-track with fittings, bolt-on D-rings or recessed floor anchors
- A wheel chock for the front wheel or tires
Working load limit vs breaking strength
Strap labels often advertise a big breaking strength number. That's the force at which the strap fails in testing, not what you should use it for. The working load limit is the maximum load for normal use, and it's usually much lower. For web straps it's commonly about a third of breaking strength. Always plan with the WLL printed on the strap's tag. A strap with a missing or unreadable tag should be retired.
Your strap is only as strong as its weakest part: the hook, the anchor and the point it's attached to on the machine.
The 4-point tie-down, step by step
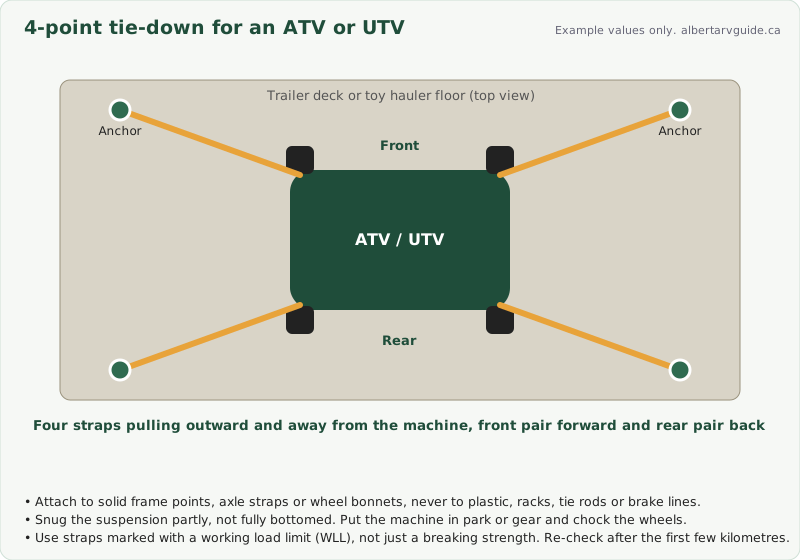
- Centre the machine on the deck, or where the toy hauler manufacturer recommends, with the weight balanced side to side. Set it in park or gear and apply the parking brake if it has one.
- Choose anchor points ahead of and behind the machine, wider than the machine, so straps pull outward and away: the front pair forward and the rear pair back. Shallow, low angles hold better against forward and sideways movement than straps pulling straight down.
- Attach to the machine at solid frame points, or use axle straps around the frame or lower A-arms where the manufacturer allows it. On UTVs, wheel bonnets over the tires are a good option because the suspension can't bounce the load loose. Never attach to plastic body panels, cargo racks (unless rated), steering tie rods, brake lines or wiring.
- Hook the strap ends so the hooks face outward, and position them so they can't fall off if the strap goes slack.
- Tighten evenly, alternating corners. Compress the suspension partly, not fully. Bottoming the suspension can damage seals and lets the load loosen when it rebounds.
- Secure the loose tails so they can't flap, fray or get caught in wheels.
- Chock the front wheels for extra security.
Re-check after the first few kilometres
Straps settle and stretch. Stop within the first few kilometres of your trip to re-tighten, then check again at every fuel or rest stop. Canada's cargo securement standard (below) requires commercial drivers to inspect cargo within the first 80 km and then regularly during the trip. It's a good habit for everyone.
Alberta: Gravel roads, washboard and cold weather are hard on straps. Synthetic webbing can stiffen in the cold, and ratchets can ice up. Inspect straps for cuts, UV fading and frayed stitching every season, and store them dry. Re-check tension after big temperature changes.
Canadian cargo securement basics
Canada's rules for securing cargo on commercial vehicles are set out in National Safety Code (NSC) Standard 10 – Cargo Securement, published by the Canadian Council of Motor Transport Administrators (CCMTA). Alberta adopts it through the Commercial Vehicle Safety Regulation. Alberta's vehicle standards page says trucks with a licensed mass over 4,500 kg must secure cargo under NSC Standard 10. Key ideas from the standard that make good practice for anyone:
- Cargo must be contained, immobilized or secured so it can't fall off, shift or affect the vehicle's stability.
- Tiedowns must be marked by the manufacturer with their working load limit.
- The combined (aggregate) working load limit of the tiedowns must be at least 50% of the weight of the item being secured. The standard explains how to add up straps and their ends.
- Cargo and securement must be inspected before the trip, within the first 80 km, and regularly after that.
Whether the formal requirements apply to your personal trailer or RV depends on your vehicle and use, so check the current rules with Alberta Transportation or the official documents above before you rely on this summary.
Toy hauler notes
- Use only the anchor points the toy hauler manufacturer provides or approves, and respect their rated capacities.
- Check the trailer's cargo carrying capacity label. ATVs, UTVs, fuel and gear add up fast, and loading the garage changes tongue or pin weight. See Trailer sway and hitch setup: weight, tongue weight and weight-distribution basics.
- E-track and L-track installs must bolt through structure, ideally with backing plates.
- Keep the ramp door's rated capacity in mind when loading.
When to call a pro
If your trailer or toy hauler lacks rated anchor points, or you're unsure whether the floor can support added D-rings or track, have a trailer shop install properly backed anchors.
Related guides
How-to videos


Videos are made by third-party creators and load from youtube-nocookie.com only when you press play. Models differ, so always follow your own manuals and the safety notes on this page.
Disclaimer: This guide is general information based on common RV designs. Models differ, so check your owner's manual and appliance manuals. Propane, 120V electrical and brake systems can cause serious injury if handled incorrectly. If you are unsure, stop and book a certified RV technician.